
I used an aluminum briefcase and some case foam to make a laptop bag. Here’s how I built it.
Read moreThe All-Seeing Fridge Ninja™
This happens to me all the time. I need to put a big thing in the refrigerator, so I clear out a spot. Our fridge tends to be full, so this can be quite a puzzle. Then before I can put the thing away, another family member puts something else right in the middle of the space I just cleared!
What’s a cook to do?
Sweetpea knows! A motion-detecting All-Seeing Fridge Ninja™!
The Fridge Ninja™ has 4 main parts, plus a few assorted LEGO pieces:
A LEGO EV3 Infrared Sensor
watches the problem area for signs of intrudersA LEGO EV3 Intelligent Brick
reads sensor inputs, plays sounds, and controls the position of the motor to move the ninjaA LEGO EV3 Servo Motor
turns a wheel to raise and lower a ninja on a stringA ninja
serves as the avatar for the system. Equal parts cute and threatening, I have no idea where ours came from. It just showed up inside the freezer one day. That’s not even a joke. One day we just had a ninja in our freezer.
You install the Fridge Ninja on a shelf above the space you’re trying to protect. It remains vigilant, watching the space below for incursions. If it detects motion, it will lower the ninja and play a nice ”hee-YAH!”. The ninja will stay there until the intruder retreats. When the space is clear again, it will say “OK” and raise the ninja.

Repel

the

Spinach

INVASION!
Sweetpea (11 years old) wrote the code herself. Most of the time was spent testing and adjusting the sensor’s threshold values to make the sensor sensitive, but not too sensitive. It turns out you need different values for “too close” and “far enough” to make it work.
It constantly monitors the sensor. When something gets too close it:
plays a “hee-YAH!”
Runs the motor to lower the ninja
waits until the invader is far enough away
plays an “OK.”
Runs the motor backward to raise the ninja
It took a lot of fiddling to get the right values for too close and far enough, but she figured it out.
It’s an AWESOME engineering project. She’s very modest about her success, but I’m super proud of her.
Silk Sleep Mask from a Thrift Store Neck Tie
I’m so proud of Sweet Pea! In preparation for a long plane flight, she wanted to make a sleep mask. Because she’s a young lady of exquisite taste and style, she wanted it to be silk. And blue (always blue).
We popped over to the thrift store for a couple of $4 silk ties. She picked two: one patterned and one with flowers. We had some heavy felt and elastic at home already, so we didn’t need to buy much.
To make a mask, she cut a piece of heavy felt just a bit smaller than she wanted the mask to come out. She took a tie apart by pulling all of the seams out and removing the lining and stabilizer from the inside. She cut two pieces of silk from the tie just a bit bigger than the felt.
Placing the pretty sides together with the elastic on the inside and the felt on top, she sewed the mask almost all the way around. She left just enough open to turn it right side out later.
After turning everything pretty-side-out, she sewed up the last little bit and captured just enough of the elastic to make it fit her head.
It’s adorable!
The second tie made another sleep mask so mom could have one too.
Firmware Update for the Weather Station
Now the weather station is a weather forecast display.
Knowing the highest temperature I’ve seen today isn’t the best use of the hi temp needle. I was there, I remember how hot it got. It’s more useful to see the forecast high temp.
There’s new firmware here https://github.com/powerfulmojo/WeatherMojo/blob/master/forecastmojo.ino
The old firmware still works the same. The new one:
Displays forecast high temp on the thin hand
Updates forecast high once daily at 4am
Adjusts all hands at once instead of one at a time
Uses http://weatherbit.io/ instead of OpenWeatherMap
Retrieves dew point directly instead of computing it
API keys moved to .gitignored a header file so I’m not uploadin’ ‘em to github
Better Particle.function() calls to control motors
Avoids blocking on long motor moves
It still looks great.

The duck is impressed
WiFi Weather Station
I have a weather station problem. Well, a series of problems, really. I think I’ve had 3 of them over the past several years, but they all suffer from one or more problems.
They don’t tell me Dew Point
Relative humidity is inferior and I’ll fight anyone who says otherwise.They lose connectivity to their sensors
I don’t need hyper-local data. I just want to know the temperature in my neighborhood, not literally in my yard. There’s no reason to deal with this.They eat batteries
The outdoor temperature sensor in particular seems like it’s always crying for a new battery.They’re ugly
Who wants THIS on their wall??
If I build my own, I can fix this. My aesthetic is mid-century modern IoT. I think it’s funny to make an internet-connected weather station and then put it in a retro-looking container with analog gauges.
The Architecture
Processor
I have a Particle Photon that’s not assigned to anything at the moment. It’s cheap, wi-fi enabled, powered directly by USB, and you can flash new software to it over the web. It’s actually really powerful and at $19, it’s not even the most expensive thing in the build.
Gauges

For the all-important dew point, I’m using a Juken X27.168 Stepper Motor. It has internal stops at each end of a 315° rotation, so it’s easy to find its zero position at start-up.
I want to display temperature and daily high temperature on one scale. To do that, I need a Juken X40 879B dual-spindle stepper motor.
They’re very low torque, but they can be driven at USB voltages, so it keeps the power situation simple.
Cabinet

I need a nice looking container to put the whole thing in. I like the look of this clock. It’s more than 8 inches across, so there should be plenty of room for everything inside.
I’m replacing the face, but I’ll reuse a couple of the hands.
Building It
Software
The Photon has plenty of memory for an HTTP Client, a JSON parser, and a library to drive stepper motors. Everything can be globally scoped and reused as long as the thing is powered on.
The first free weather API I found is OpenWeatherMap. It doesn’t have dew point explicitly, but as everyone knows:
        Cγ(T,RH)
Tdp = ⎼⎼⎼⎼⎼⎼⎼⎼⎼⎼⎼⎼
       b - γ(T,RH)
where
         ln(RH/100) + bT
γ(T,RH) = ⎼⎼⎼⎼⎼⎼⎼⎼⎼⎼⎼⎼⎼⎼⎼⎼⎼
             C + T
and
b = 17.67, C = 243.5,
T = temp (°C),
RH = relative humidity
So computing dew point and stepper motor positions is just a little algebra. I passed Algebra last century, and I still remember a lot of it.
The firmware is at https://github.com/powerfulmojo/WeatherMojo.
Particle variables and functions are documented here.
Electronics
The X27.168 and the X40.879B are driven by L293D dual H-bridges. They’re about 80¢ each when you buy 10. They have built-in flyback diodes to protect the Photon from any inductive-load-related nastiness that comes back from the motors.
Here’s what the design looks like:
schematic
It’s a lot of wires, but it’s not very complicated. Each H-bridge has 4 power pins, 4 ground pins, 4 processor connections, and 4 motor connections. I was able to squeeze everything onto a 24x18 perfboard.
Since the X40 has front contacts, I soldered that to its own board and used right-angle headers to connect jumper wires to it.
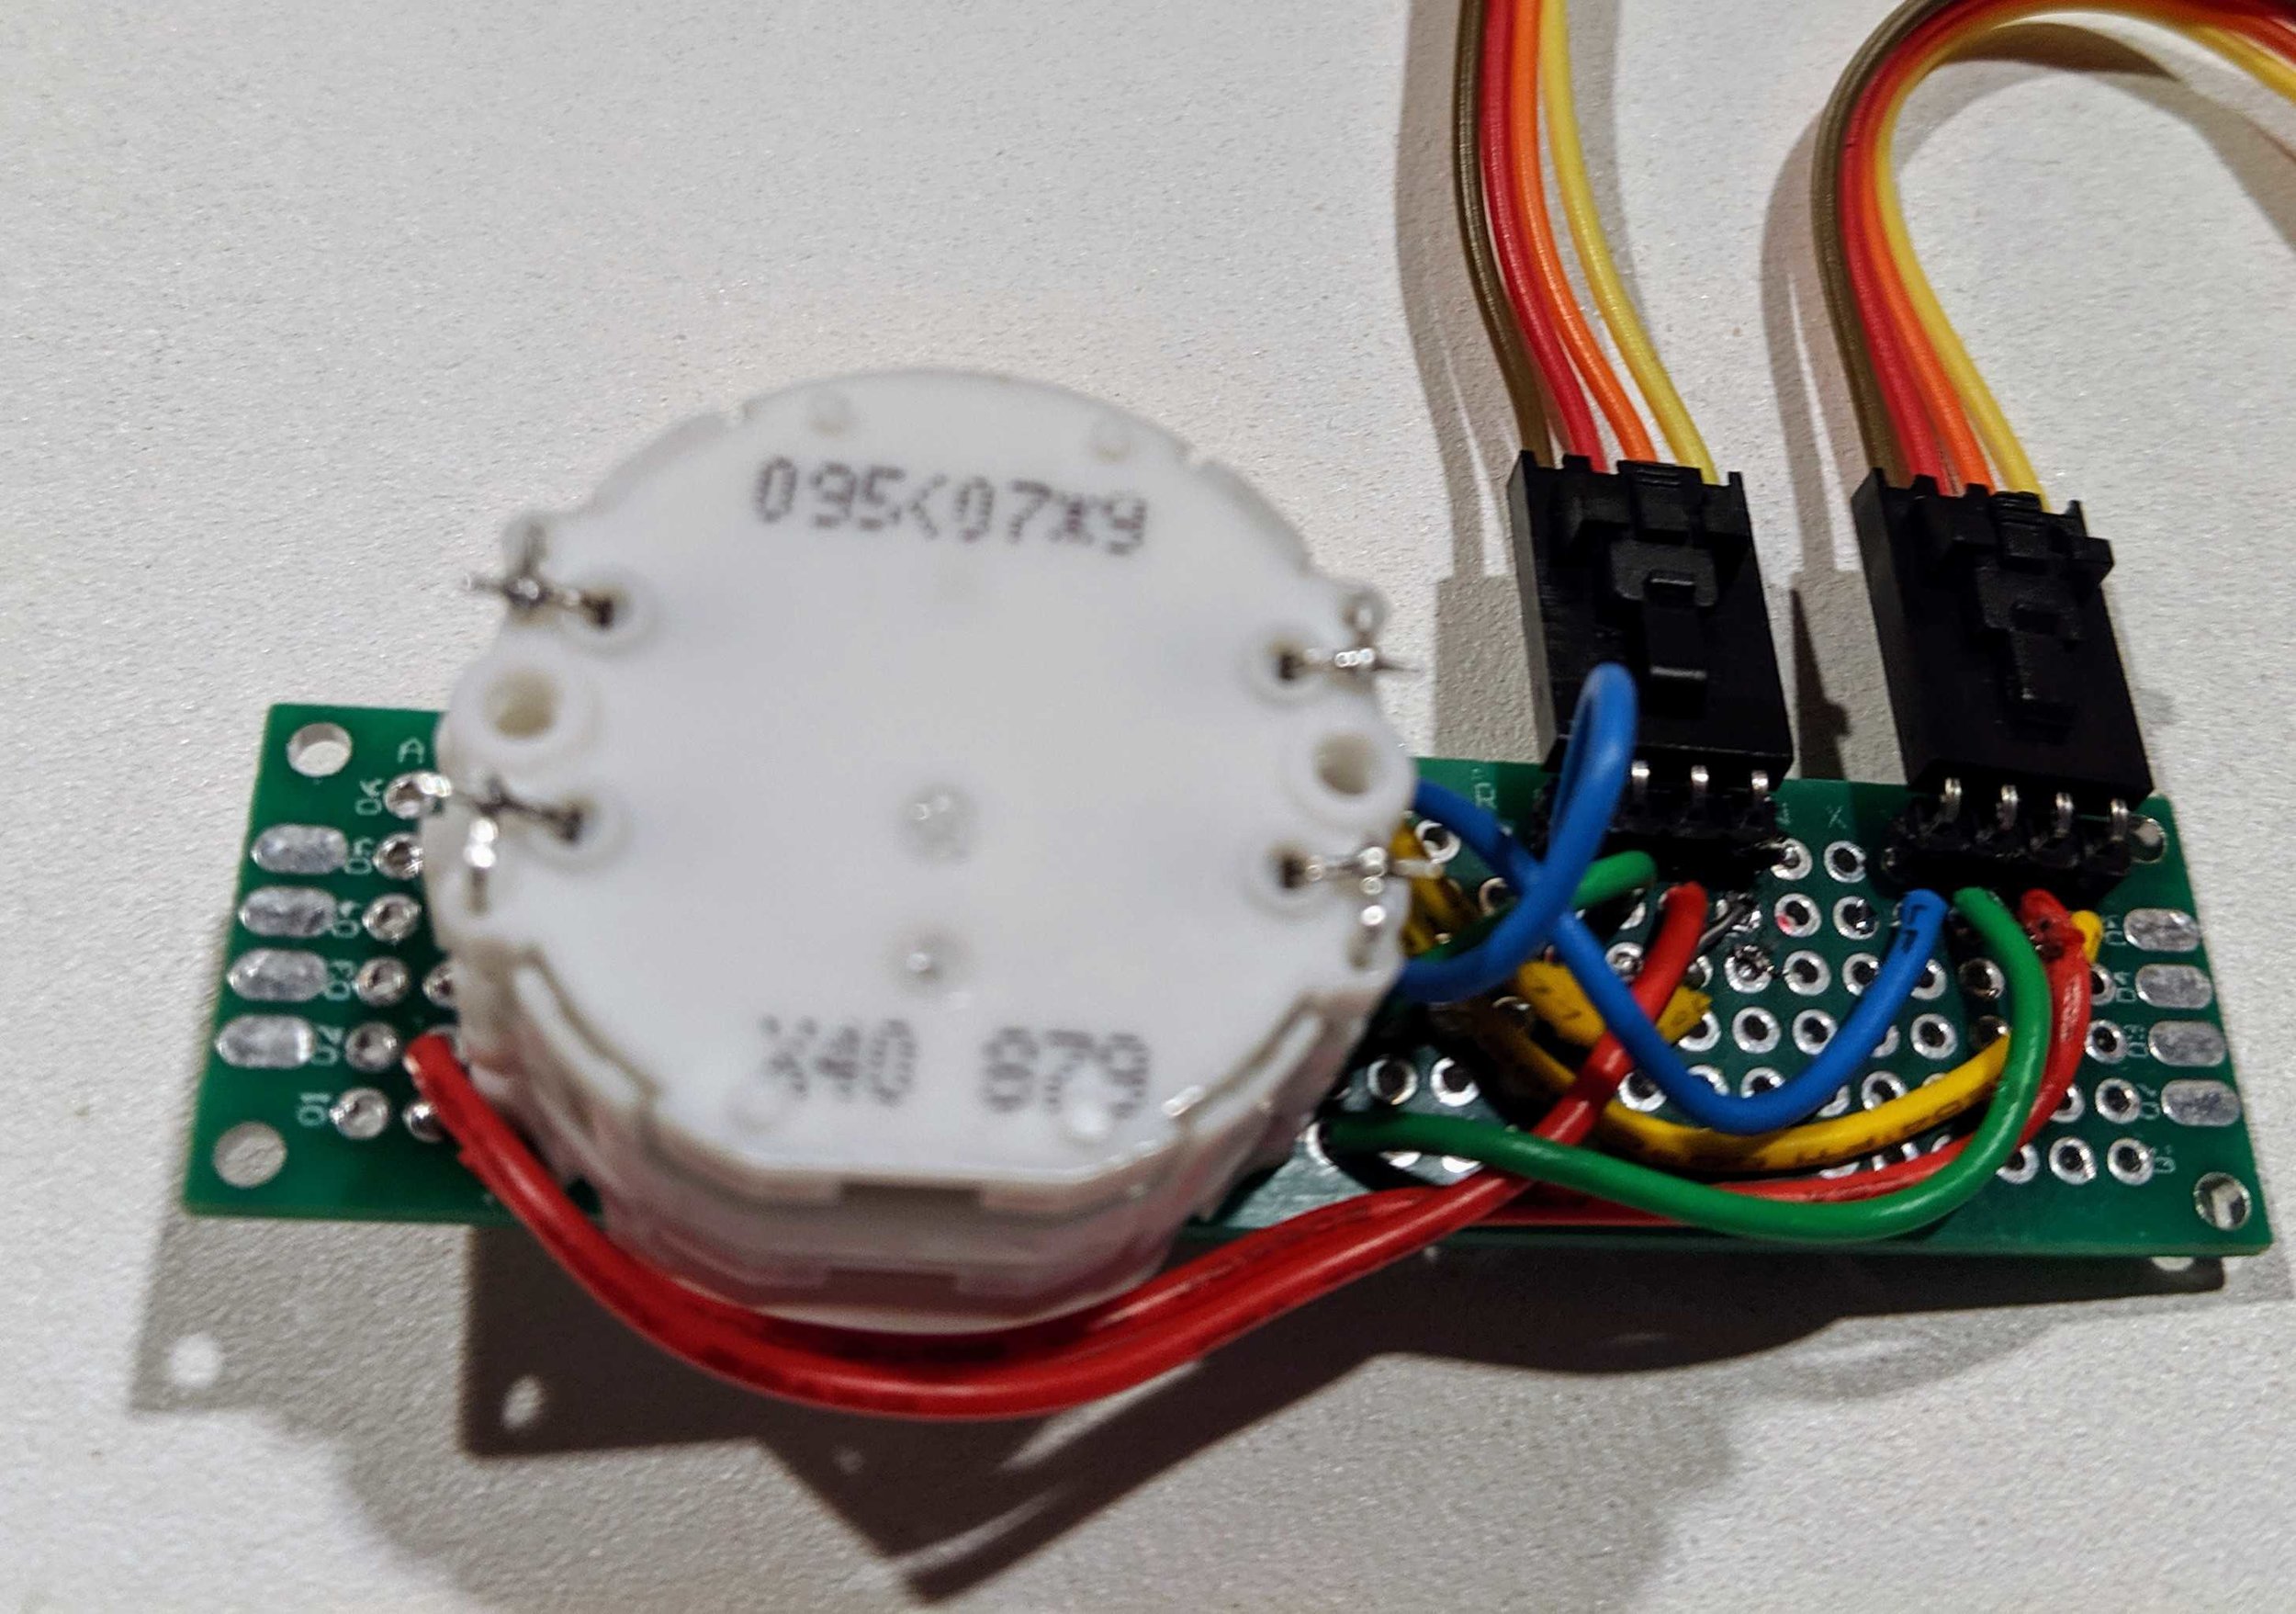
I had to fiddle with pin assignments to get the motors spinning in the right direction, but that’s all software. I did it after everything was soldered in place.
The Gauges
The face is a stainless steel disc I got from an eBay seller. I drew up some concept gauge layouts to see what I liked.
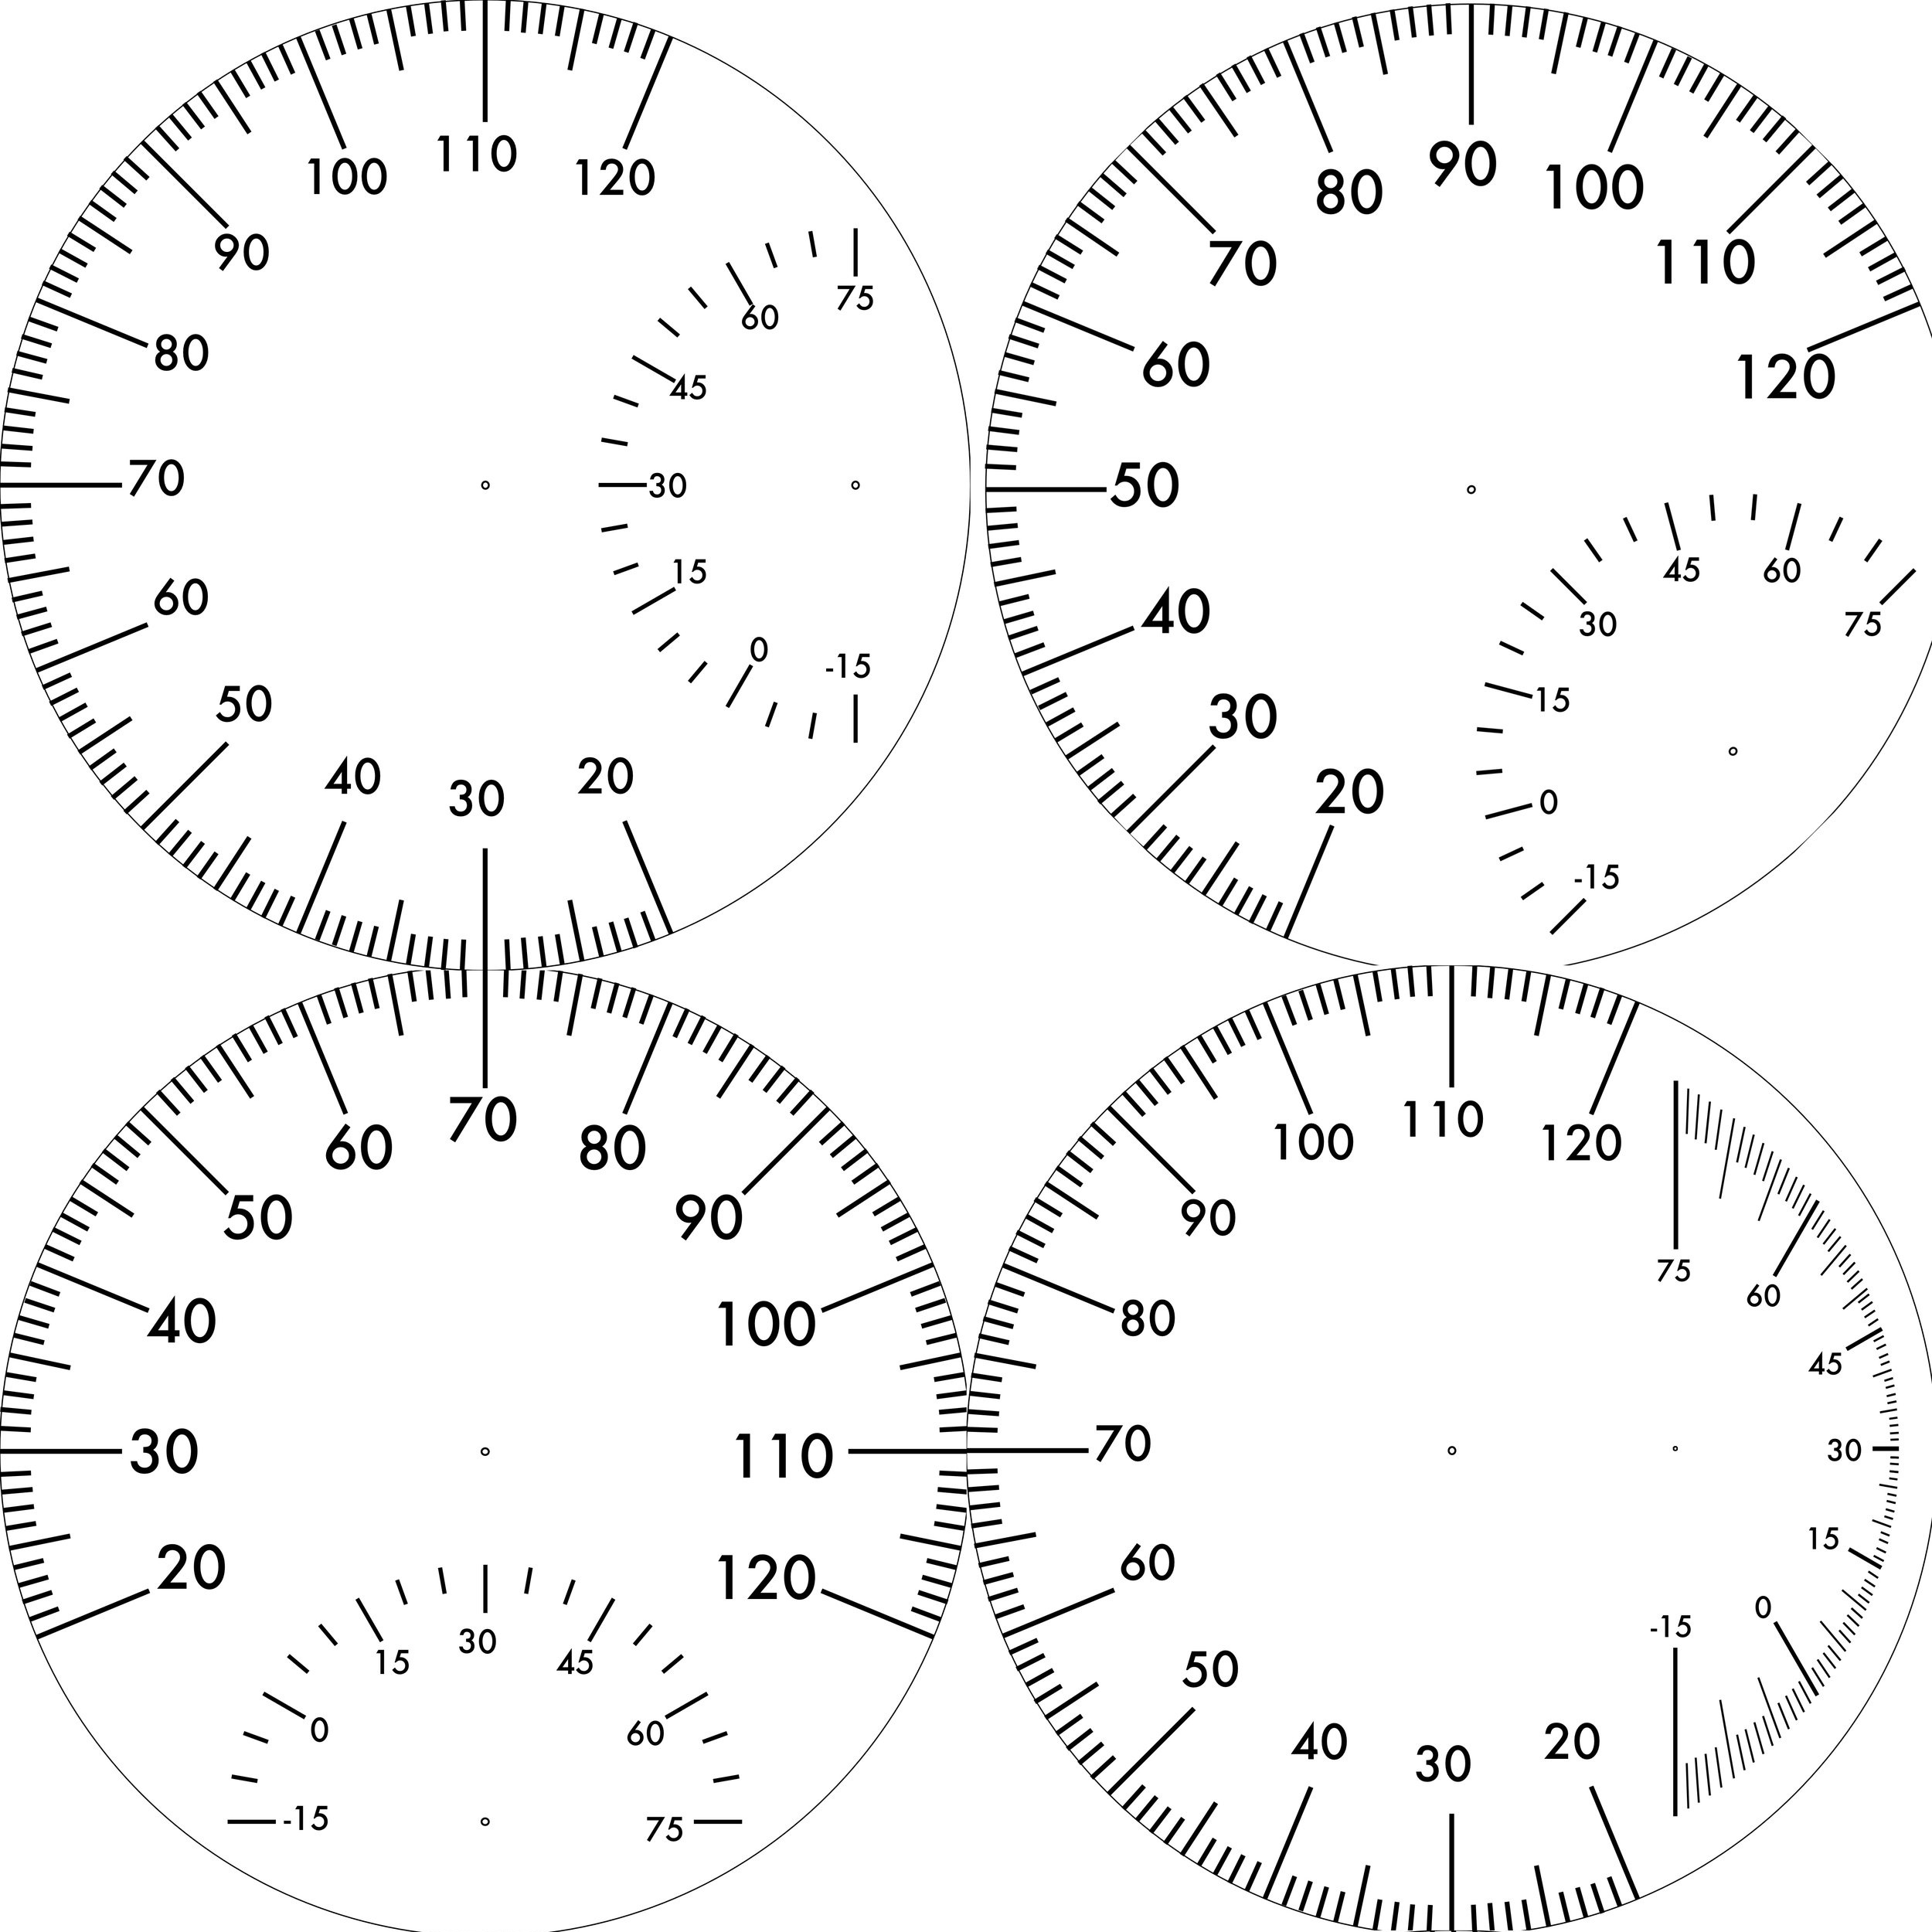
I printed the gauges on some water decal paper on my laser printer & applied it to the steel in one piece.
The hardest part of the project was actually attaching the gauge hands. The contacts on the temperature motors are on the front, so all of the connections have to be made between the motor body and the back side of the face. The spindles only stick out a few millimeters in the first place, so I spent a whole day driving back and forth to the hardware store trying out parts I might use to mount the hands to the motor.
If you try this, save the clock mechanism. It already has parts that fit the clock hands. That way you only have to adapt them to fit the motors.
The Finished Product
I love it! I probably ended up spending as much as I would on a decent weather station, but this one shows me data I actually care about.
Front
In Situ
Back
The big hand shows current temperature while the skinny one shows the highest temperature seen today. Most of the time they’re overlapping but as the temperature cools down, it shows you how hot it got today. It resets every morning at 9:00am so you still have a little time to see yesterday’s high at breakfast.
Sunglasses Holder
This post documents the series of errors, messes, and disasters I created when I tried to make another copy of a thing I already have. This is that thing:

It's a porcelain nose that holds glasses. Cool, right!? But we only have one, and we want more. So I tried to make another out of plastic.
The Plan
Get some Mold-making Silicone from Amazon (for about $30) and make a copy of the thing out of some Casting Resin (for about $33). I went ahead and got some Mold Release too ($15).
I don't know how much the porcelain nose cost in the first place, but it was likely less than $78. Still, it will be a fun project. Right?
So I built a box out of foam core board and sealed everything up with hot glue.


First Problem
I made the box too big. So one package of mold-making silicone wasn't enough to submerge the thing. Luckily, the liquid and solid forms bond just fine, so this shouldn't be a problem. I went back to Amazon and got more silicone (new total cost $108).
However, the box I made was so ridiculously oversize that TWO batches of mold-making silicone were not enough.
So I grabbed some shot glasses and used them to displace some silicone at the corners. That raised the level of the mold above the top of the part I was trying to capture. It ended up looking weird, but working fine after I pulled the box walls off.

Second Problem
I didn't have a disposable plastic mixing bucket big enough to hold an entire batch of silicone, so I used a 4-cup Pyrex measuring cup. It worked fine for mixing and pouring, but I learned a hard lesson: silicone sticks to glass. I spent an hour trying to clean it up before I realized they have new cups on Amazon for $12. That also means those shot glasses ($7) are a permanent part of my nose mold, bringing the total cost to $127. But since we don't really do shots anyway, call it $120.
Unmolding
It worked! It's another nose!

The shape is pretty good. I can see a few bubble defects on the surface, especially near the bottom, and the base has some sharp edges, but it's definitely a nose. I used some 120-grit and 1500-grit sandpaper to clean up the sharp edges and make the bubbles less noticeable.
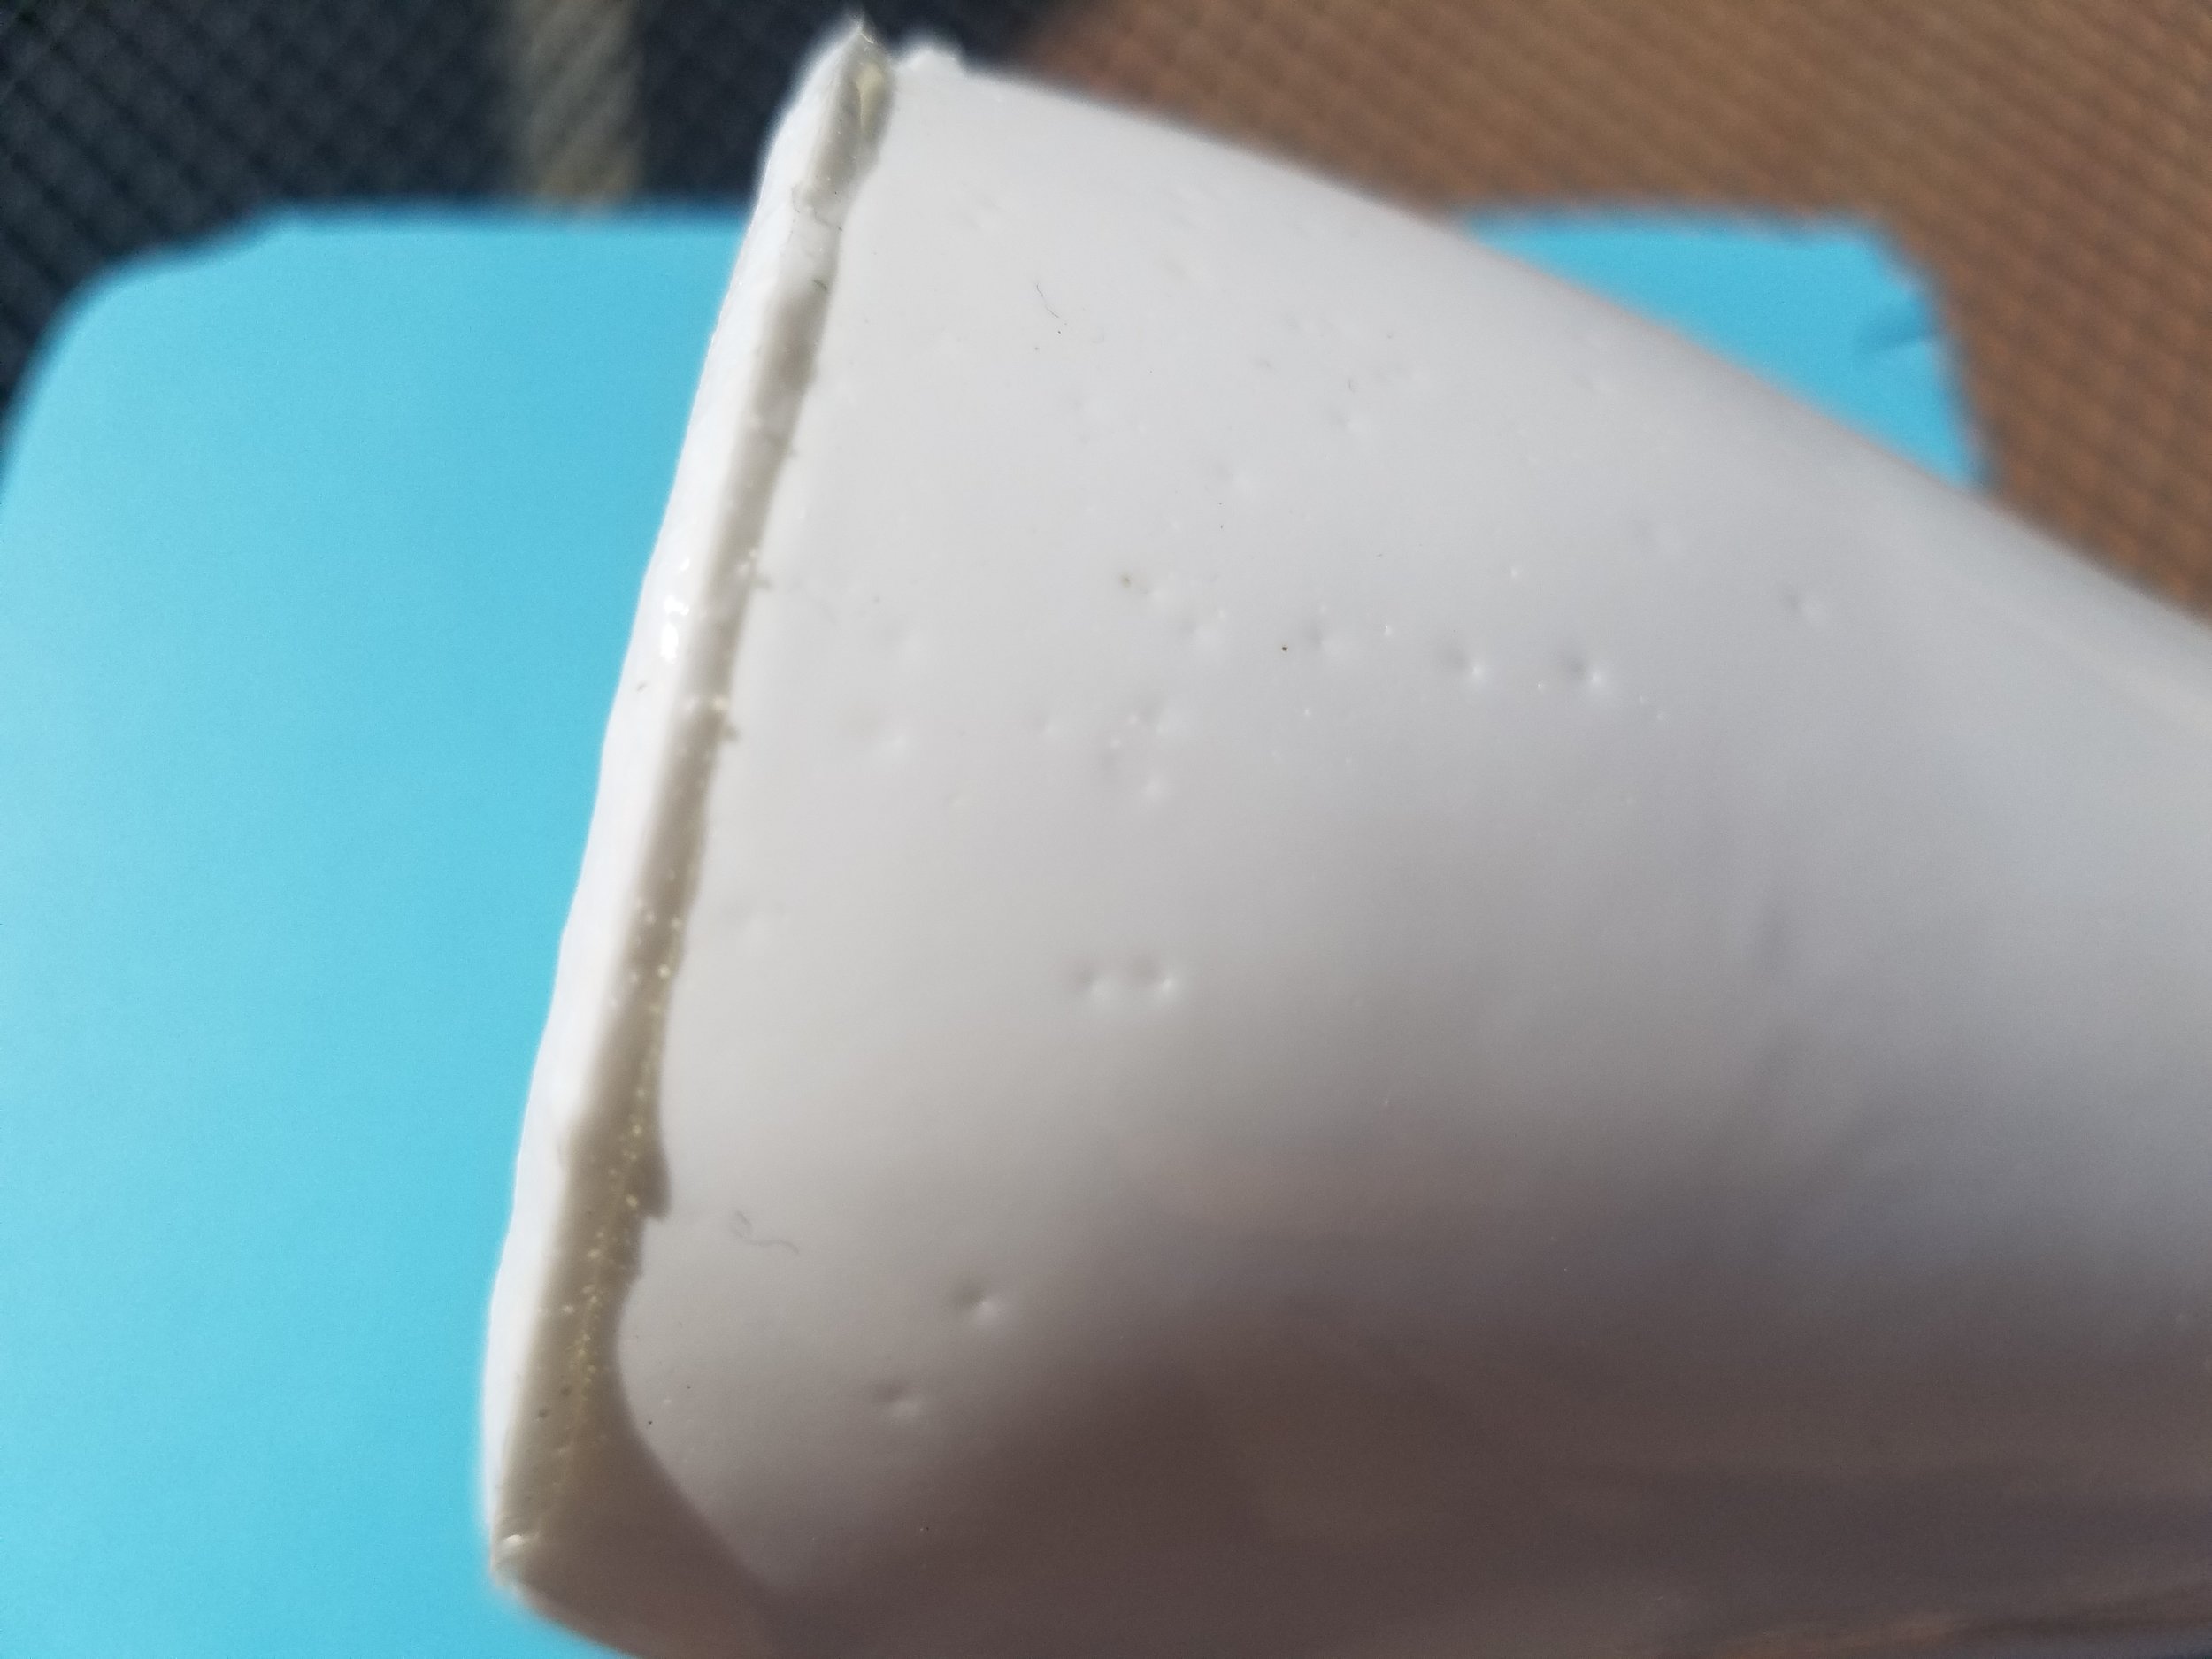
Needs a little clean-up with sandpaper
Technically, I only used $33 worth of consumable material. If I had measured carefully, I could have made two from that supply of resin. If I had cut my mold box more carefully, I definitely could have cast it with one package of silicone.
Sure it was expensive, but all of the messes were cleanable, nobody got hurt, and next time I'll be way better at it.
Tae Kwon Do Belt Rack

You may not know this about Danger, but he's a stupendous bad-ass.
He's been studying for about 5 years, and he just earned his 2nd Dan Black Belt.
Now that he doesn't need to wear his 1st degree belt, we made him a place to display all 13 belts from white through black.
It's made out of 1/2" mahogany and has just enough room to store everything he's earned along the way: 12 colored belts, 1 black belt, a sword and 2 sais.
We may add some hooks to the bottom so he can hang some of the medals he's won at tournaments.
We designed it in about an hour, cut it in about an hour, and then spent 2 full days sanding, gluing, and clamping it. The finish is my old stand-by, Maloof Poly-Oil for that in-the-wood shine.

Here’s the sketch I worked from. I used two widths of mahogany, and it was already surfaced on all 4 faces. The 5” stock makes the sides and shelves. The narrower stock (3”) makes the dividers. There are two pegs inside the black belt to keep it stretched out on its shelf.
Civil War Rifle Prop
This year in Danger's Social Studies class, there's a family assignment: make a replica rifle to carry at a reenactment of The Battle of Gettysburg.
The Assignment
The rules for the assignment are:
- It has to be based on an actual rifle that could have been at the battle
- It has to be the proper dimensions and design for the rifle
- Submit a drawing of your weapon for approval before you build it
- It must by made of wood (very small metal parts are allowed for decoration)
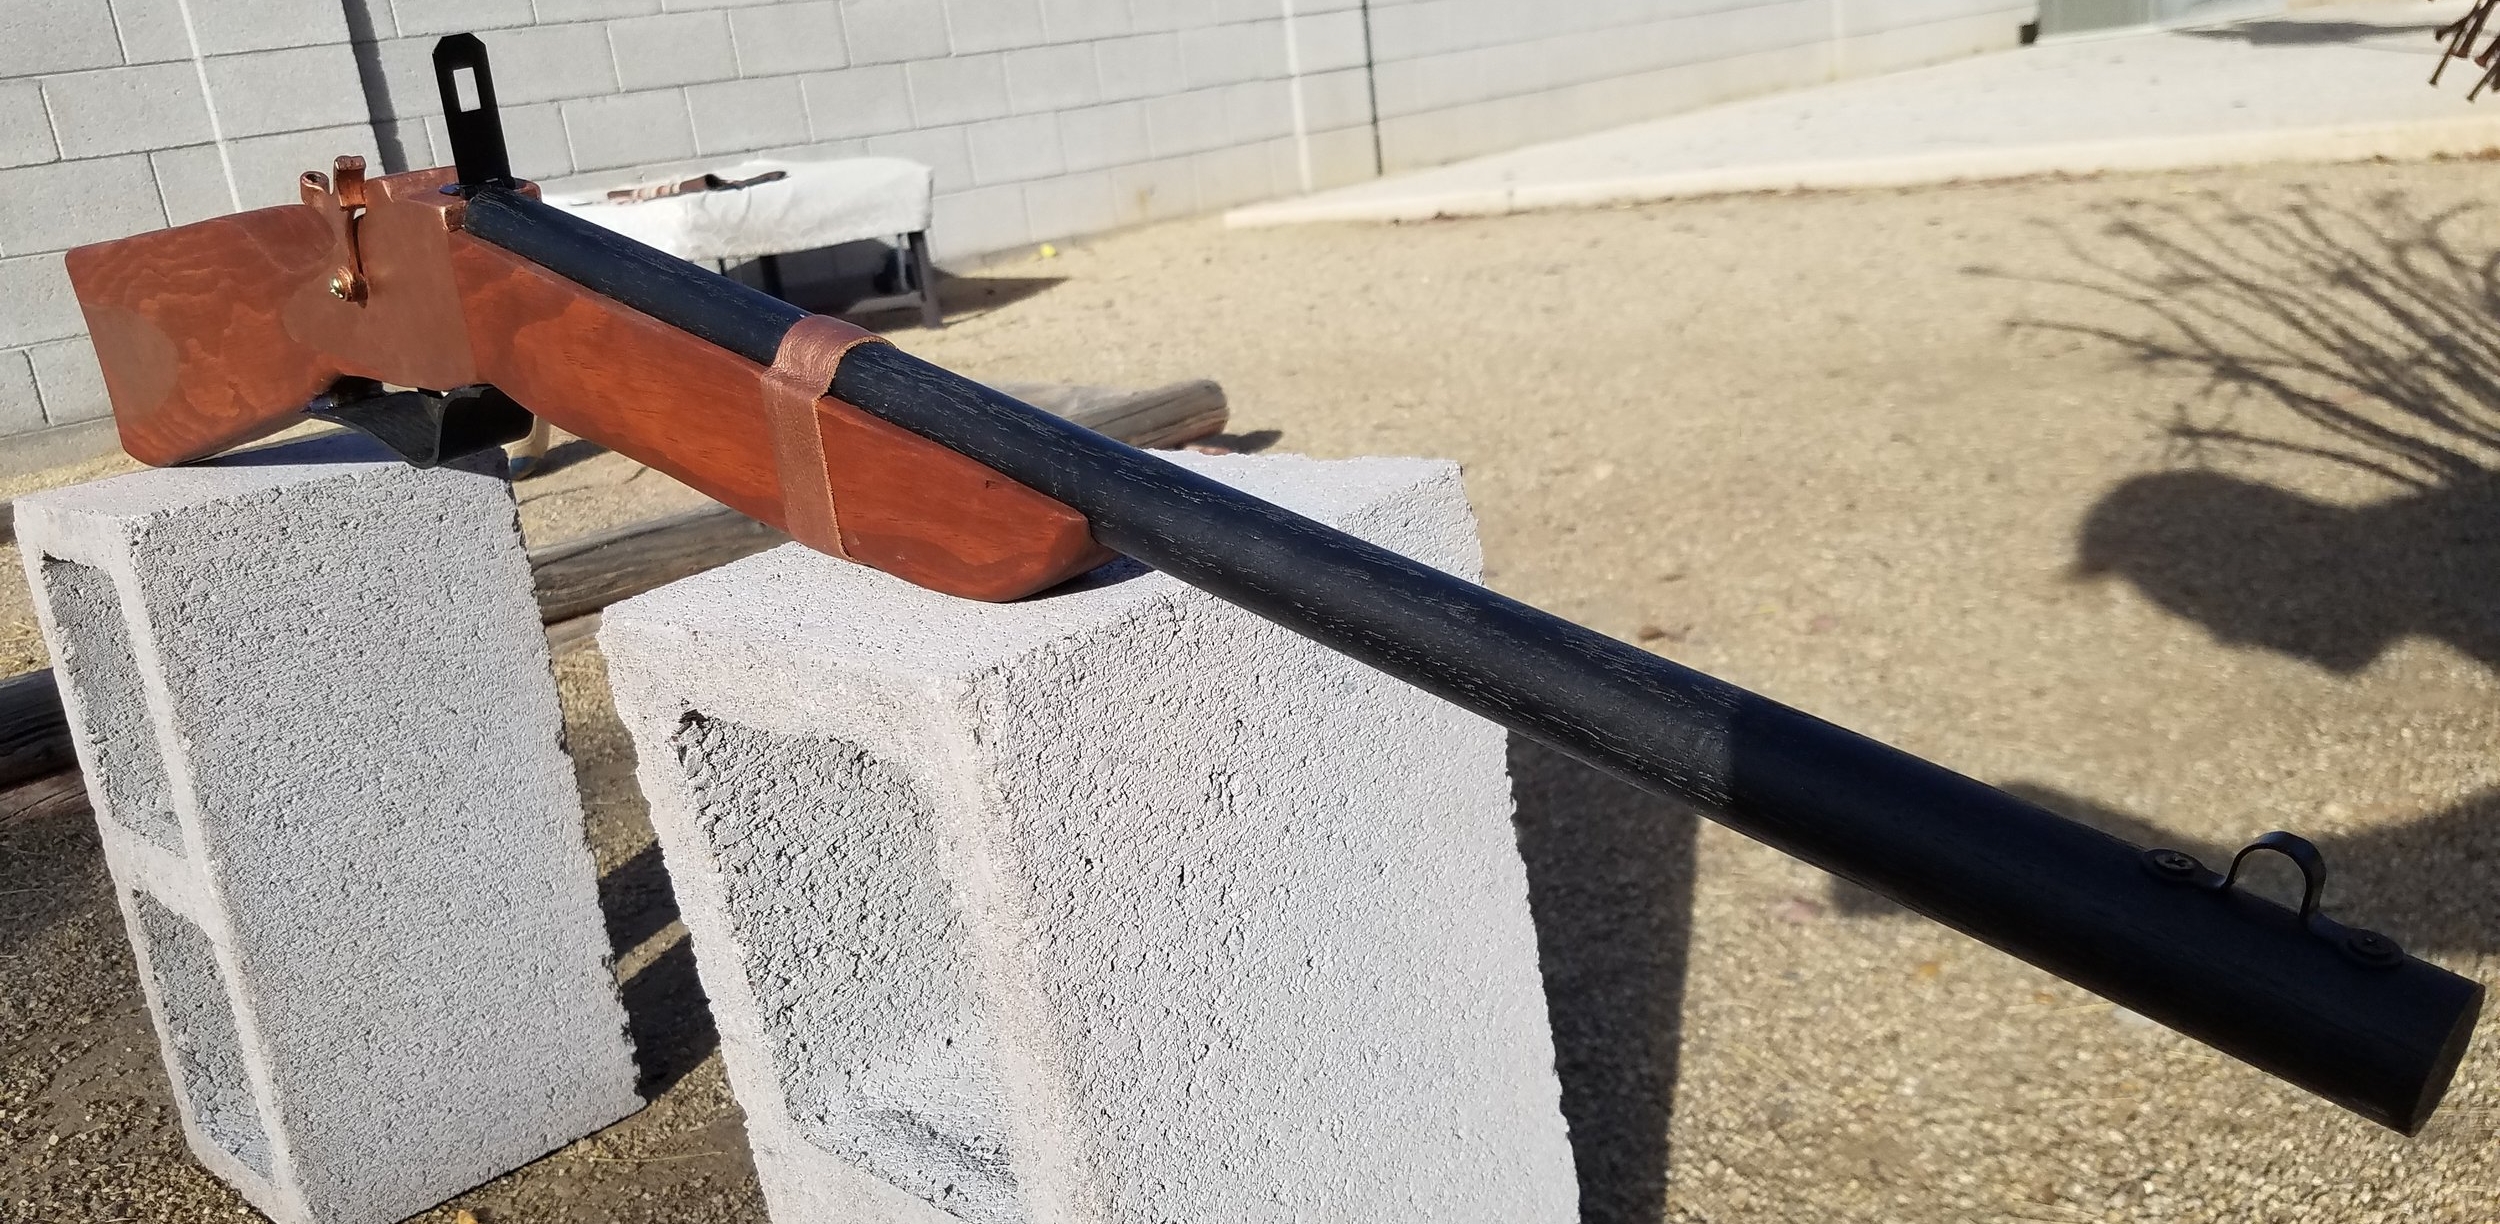
He chose the Sharps Carbine as his weapon. It's a good choice since he's portraying a captain in a cavalry regiment, and that was the most popular weapon for cavalry soldiers in 1863.
The Specs
We knew the weapon was 47 inches long, so we grabbed a bunch of images of it and figured out what the rest of the dimensions needed to be. First, Danger sketched it on notebook-size paper for approval.
Then he transferred the image to a full-size drawing on butcher paper. He stuck the butcher paper to some cardboard and cut it out, then transferred the outline to our board.
The Materials
To make it, we found parts at the orange store & Amazon:
- 1 ea. 1x6 select pine board, 4 ft long
- 1 ea. 1x¼" oak board, 2 ft long
- 36" of 1" oak dowel
- 1 ea. hinge pin door stop (because it looks like a hammer)
- 1 ea. small black hasp latch (because it looks like a rear sight)
- 1 ea. ½" straight cut router bit with bearing (at least ¾" cutting height)
- 1 ea. 1" cove router bit
- ½ oz. Rub & Buff wax finish in antique gold
- 2 ea. brass wood screws, small
- 10" or so of scrap leather, 1" wide.
- Wood stain in any color you like (we used English Chestnut)
- Spray primer
- Spray paint (we used Oil-rubbed Bronze)
The Stock
The stock will be made out of pine boards. The thickest part of the stock will be 1½", so we traced the template twice on a ¾" thick board and cut out two identical shapes with a jigsaw.

We cut a ½" radius quarter round into each half to hold the barrel using the cove bit. Then we glued them together and used the straight cut bit to take a little extra material off of each side where the jigsaw cut wasn't exactly the same. I used a chisel to square up the round end of the channel so that the flat end of the dowel could fit.
We rounded over the outside of the rifle all around the stock, but not the lock. So the wood-colored parts will have round edges and the metal-colored part will have square edges.
Finally, we stained it with some English Chestnut stain so it looked more gun-colored.
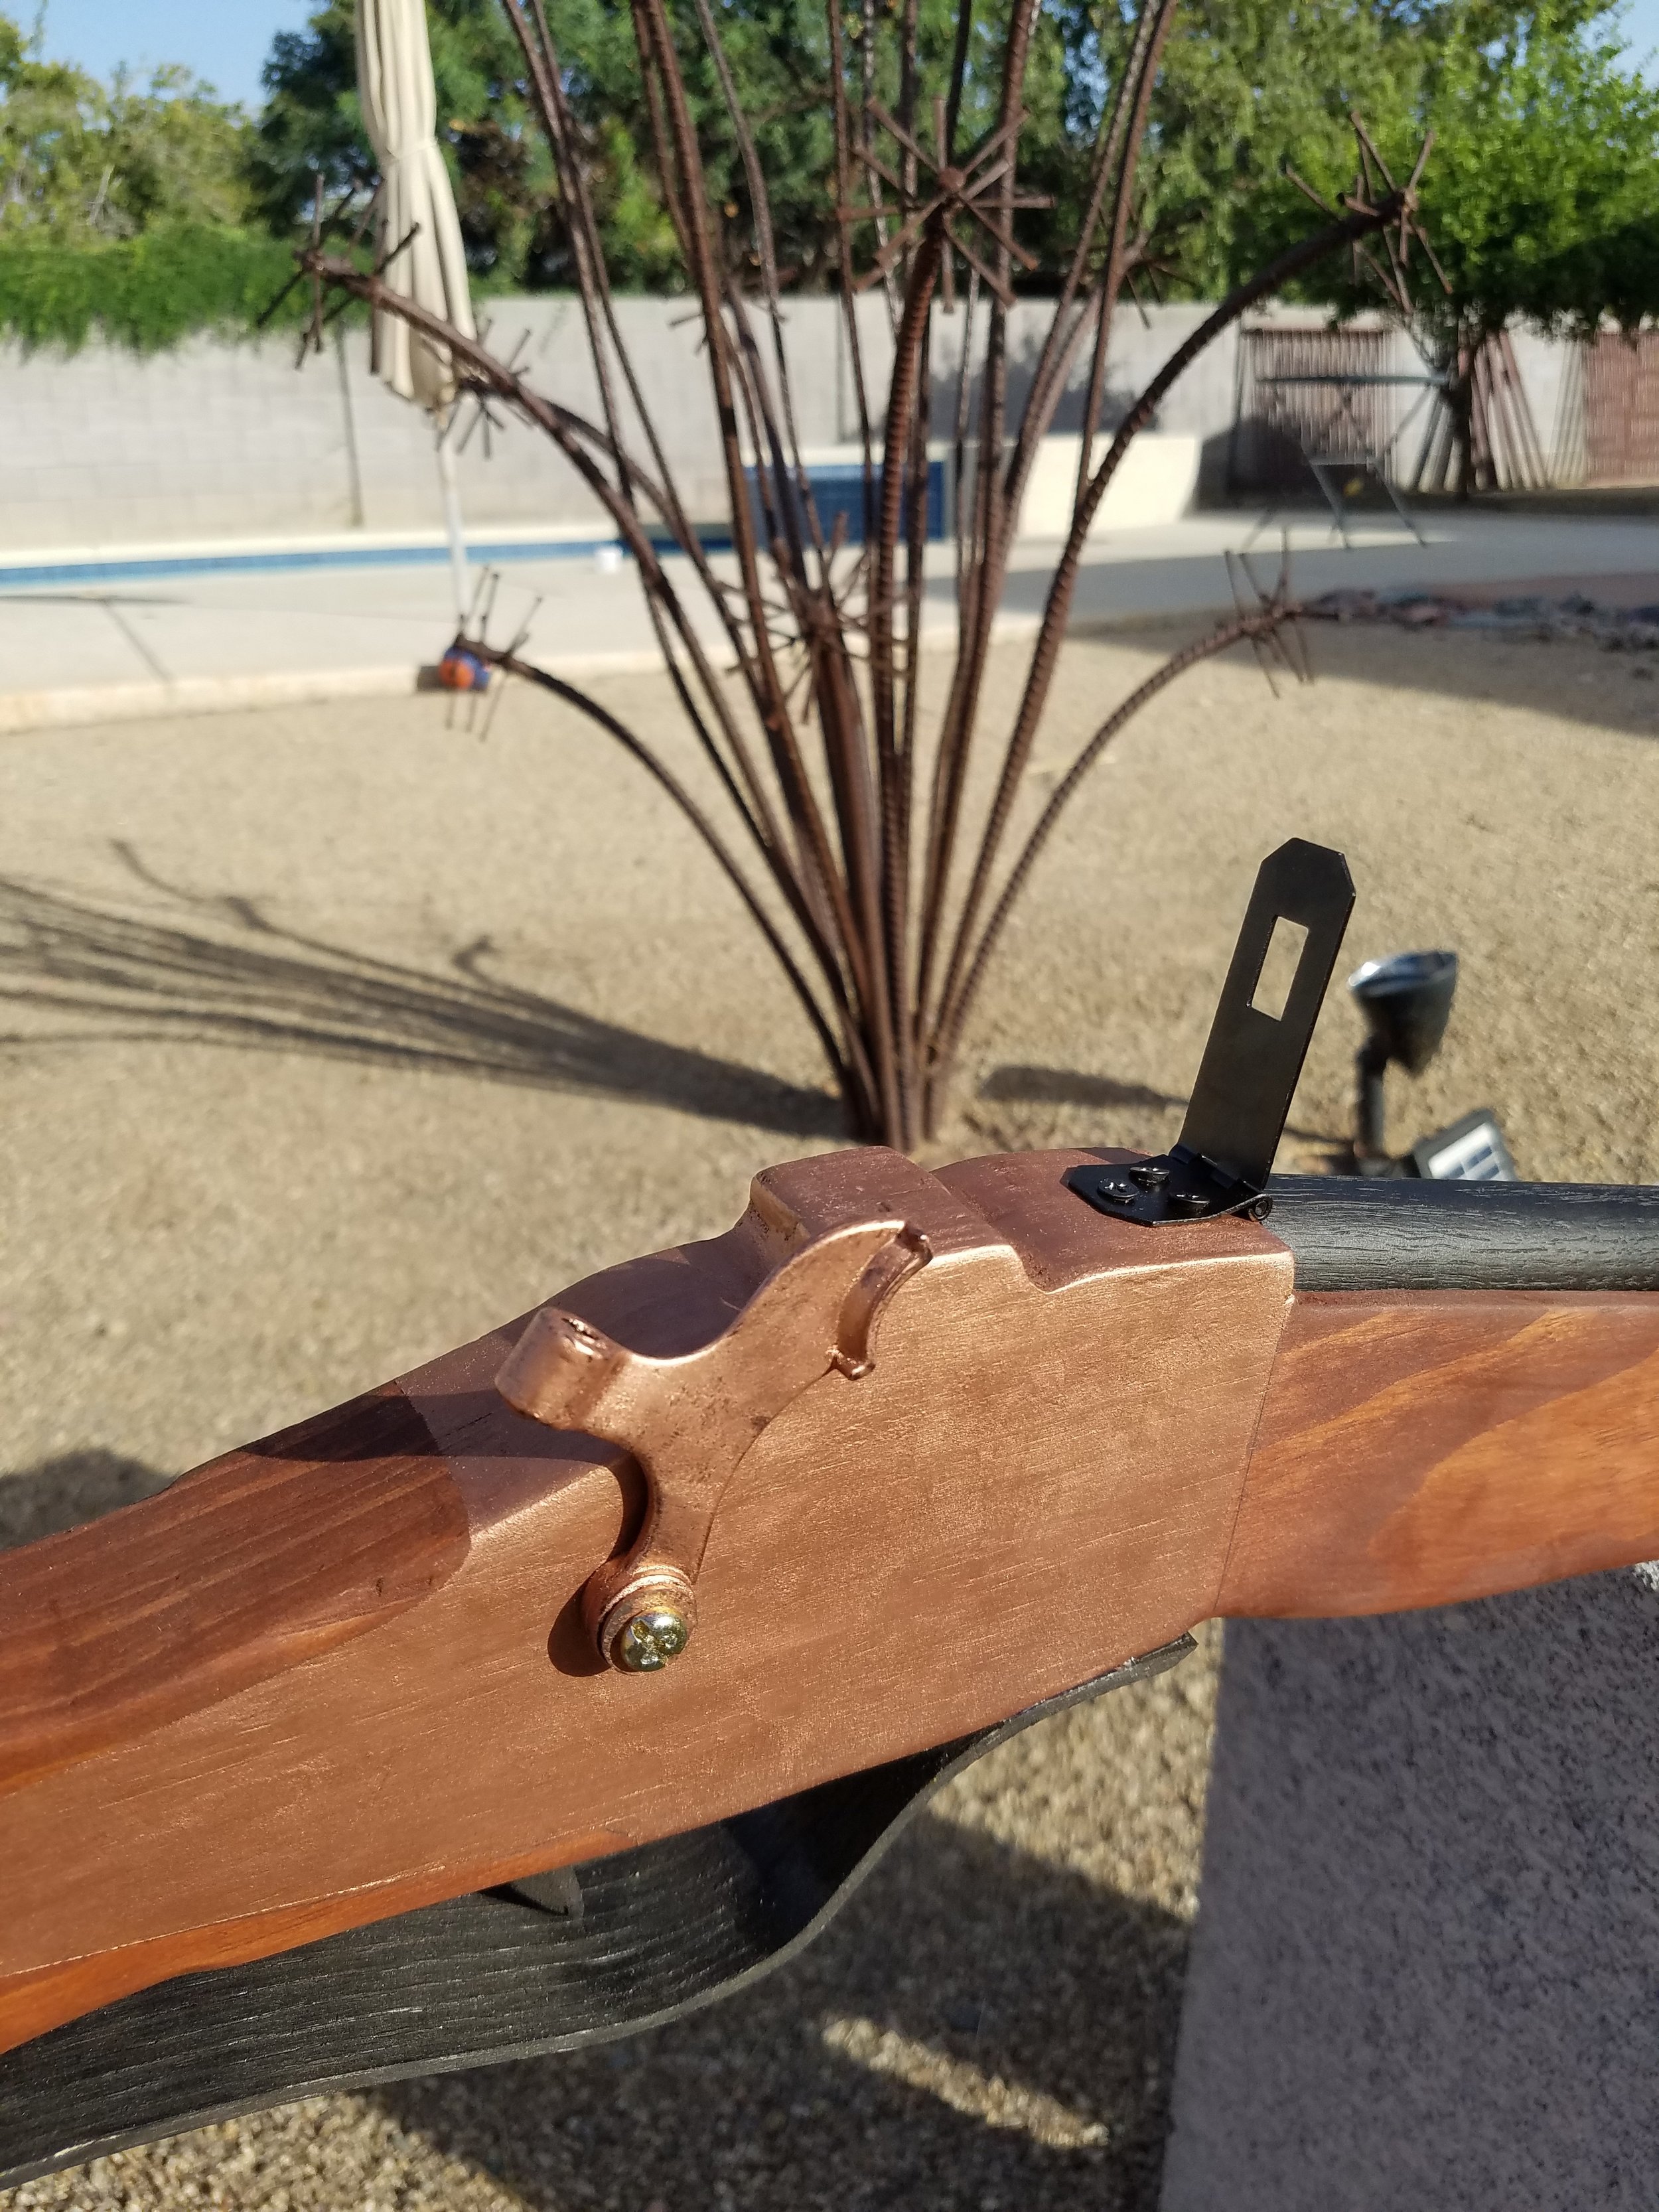
The Lock

The "metal" parts of the gun are Rub n Buff wax finish put right on top of the stain. Danger masked very carefully around where the wax should go and then applied a few coats.
While he had the wax out, he also put some on the leather strap and the part of the door stop that looks like a hammer.
The Barrel
This was the easiest part: we just cut it to length and applied spray primer and spray paint. When it was dry, we glued it into place.
The Trigger Guard
This was the hardest part. We build a jig out of 2x2" poplar, then used steam to soften the wood and clamp it into the jig for bending.

This technique pretty much turned the ¼" oak into splinters. So we tried again. I used a belt sander to thin the oak down from ¼" to about ⅛". That actually worked quite nicely.
I made a trigger out of... something I found laying around. I can't remember. I just carved it then drilled a hole in the lock to hold it. The trigger and guard got painted black like the barrel.
The Finishing Touches
Danger added a couple of subtle brass screws to hold the "metal" in place. The hasp hinge made a flip-up rear sight and the loop that goes with it made a front sight. I hot glued the leather strap around the stock & barrel so it looks like it's holding the barrel on. Finally, the door stop made a hammer that you can move back and forth.
Garage Door Opener Transplant
A while ago, I put an Eject Button in the VW. At the time, I put an external port in the garage remote, and it totally paid off: I just transplanted it.
The External Port
To put the port in, I got a mono audio cable from Amazon & cut it. I soldered the panel-mount jack to the inside of the garage remote and connected the plug to the eject button. It came out looking reasonably good on the remote.
I thought I may have been wasting my time back then, but it made it easier to move the opener to a new car without desoldering anything.
The New Button
Sadly, I could not find a custom-engraved OEM button that said "Eject" to go in the new car.
But I did find a switch cover just like what's already in the unused button spaces. I drilled a hole in that and glued in a momentary switch and pigtail connector. I soldered the pigtail connection to the mono audio cable. A little heat shrink tubing kept things nice & neat. Now pressing the button activates the garage remote.
The switch popped right into the unused button space on the lower dash.
I didn't hook up the 12V power, but I might do that later. That would make the ring light come on, which would be a nice touch.
Installed
I routed the wires through the dash and hid the opener inside a trim panel. It came out looking pretty good! Having a port in the opener was nice: When I sold the old car, I pulled the opener out and hooked it into the new car. Having a plug at the end (instead of a whole remote soldered there) makes it much easier to fish it through the dash. All of the soldering was done at a workbench, instead of kneeling next to the car. For once I wasn't over-complicating things: I actually used the portability feature I built into the remote!
Togepi Bag
Sweetpea is dressing up as Misty for Halloween and she wanted a Togepi bag to hold her candy haul.

It's my first time using a sewing machine, but I think it came out OK.
The bag is just a plain white canvas bag from the craft store. I paid $5.
Togepi's head, feet and hands are plain yellow cotton fabric with some batting stuffed in the hands & feet.
I drew the face using Acorn and printed the parts out on heat transfer paper. The triangles on the shell were supposed to be printed too, but my printer ran out of ink and I wasted my last sheet of transfer paper. We just drew them with markers instead.
To get the bottom of the bag egg-shaped, I had to cut it, which was fine because that gave me a chance to put the hands & feet inside the seam.


This thing will hold at least 5 lbs of candy. It's not perfect by any stretch, but not bad for literally my first sewing machine project ever.
Chainmail vs. Slingshot
Remember when I made armor for the kids? I decided to see how effective it actually is. So I shot at it with a slingshot & filmed it.

I started with a naked watermelon and shot 3/8" steel balls on my Pocket Predator slingshot using 1" wide TheraBand gold bands.
Danger & I tried to measure how deep the shot went, but we completely lost the ball. We had to cut the melon open looking for it, and we still couldn't find it. We had better luck finding the 3/4" ball, which penetrated almost all the way through the melon.

No sign of the small ball

The big one went almost all the way through
Then we tried it with the chain mail. We took 5 shots with the 3/8" ball and then 5 shots with the 3/4" ball.
It deflected every shot and the melon only showed a little scratching. No dents and definitely no penetration. The armor itself showed no sign that it had been hit.

Before

After
I imagine if you wore this armor over bare skin, you'd receive 3 injuries:
- Bruising because a 3/4" steel ball going a couple hundred feet per second hits pretty hard.
- Scratching because the metal rings would get dragged across your skin pretty forcefully.
- Burns because it was 110 degrees out when we did this and that steel got hot.
The verdict: It totally works! This armor completely prevented the ammo from breaking the watermelon! Check out the video to see it in action.
Wood Dice Tower
I've already written about how much better custom dice make Axis & Allies. But what makes it even better is a dice tower and spacious tray to keep everything contained and orderly.
Danger built one out of Lego, and it was pretty cool, but it's tough having a lot of Lego blocks locked up permanently. So I built a new one.
The Problem
My dice keep going all over the place, and man, do I have a lot of dice.
The Solution
I built this out of alder hobby boards. I kept the joints simple because this is a light duty item. The finish is just mineral oil and I put some non-skid pads on the bottom.


There are some baffles on the inside to knock the dice around as they fall. There is nothing to dampen the sound, so this really makes a racket when a cascade of dice is tumbling through it. I made the top fit inside the base so when it's not standing up, it saves a little space. I did that just by making the front & back surfaces overlap their butt joints on the tower, and making the (longer) sides overlap on the base.
Now our dice can't escape, no matter how epic the battle gets.
If I were going to make it again, I'd keep the tower smaller. There's no reason to have more than an inch of depth. It just takes up more space and makes a lower-pitched noise as the dice fall.
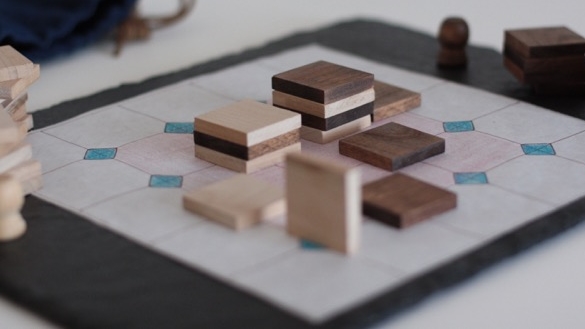
Better Tak Board
When I built the Tak set, my focus was really on the pieces (after all, you can play without any board at all). But the pencil-on-butcher-paper board wasn't very nice. So I built a new one:

It has 2" squares with lines in pen. The colors are watercolor on unprimed, natural canvas, and I'm really happy with it. I was going to finish the edges, but I kind of like the lightly frayed, well-traveled look, so I brushed a tiny amount of Mod Podge around the edges. That should arrest the fraying to keep it looking lightly abused but not ruined.

Go check out their kickstarter and get your own Tak set as soon as they're for sale!
Tak: A Beautiful Afternoon Project
Maybe you saw a Kickstarter for Tak: A Beautiful Game. It's a game that makes an appearance in Patrick Rothfuss's Kingkiller Chronicles. I love (love!) The Name of the Wind and The Wise Man's Fear and I thought The Slow Regard of Silent Things was a delight. I will gladly consume anything set in that universe, so I may be a bit biased, but Tak is a good game.
The game will be produced by Cheapass Games, who already made two of our kids' favorites, Pairs and Lord of the Fries.
Aside: I'd especially recommend Pairs for playing a quick game while you're trying to keep the kids busy at a restaurant. You only need a tiny amount of table space, and you can sweep it up in a hurry.
The Kickstarter will deliver in November, but I couldn't wait that long, so I built a set. I used some alder boards left over from a dice tower I made. They're 1½ inches wide and ¼ inch thick. I used my Fine Kerf Saw to cut 40 identical squares out of the alder and sanded everything lightly with 320-grit paper.

At first I tried gluing up some shaped pieces to be my capstones, but they looked too much like standing stones, so I bought some decorative dowel caps, and they're great.
Half of the pieces are completely unfinished. I put the other half in a baggie with some Special Walnut Stain and let them soak for 15 min.
I stitched up a denim bag and added a lace leather drawstring to hold the pieces.
I don't have a great board yet. I just drew one with a sharpie and colored pencils on butcher paper. The squares-and-diamonds design is pretty much the same as on Cheapass's site. Maybe I'll make a better board next.


It took me about 2 hours to make and stain the pieces. Then it took another couple to hand-sew the bag. The board took maybe 30 minutes. Not bad for a few hours' work.
If I were going to build another set, I'd get some thicker alder. These tip over a little too easily. They're still acceptable, I'm just picky.
We've played quite a bit, and it's a really fun game. The pieces are easy to see and move. Danger already announced that he's going to build his own Tak set out of Lego.
Long Sofa Table
We just got a great sofa for the family room. And what do you need when you have an 8-foot long long sofa and need a place to put a drink? An 8-foot long sofa table!
So Mrs. Mojo commissioned a long, narrow sofa table. It's 8 feet long and only 11 inches deep. I made it out of 1" maple from the orange store. The top, sides, and shelves are made of 1x6 boards joined with a biscuit joiner.

about 9 times as long as it is wide
The end that faces the front door is just a plain plank like the tabletop. The other end has shelves where we'll be able to store and charge the ever-growing number of phones, tablets, and e-book readers we're accumulating.

One plain end

And one end with storage
You can't see it in the pictures, but there's a skirt of 1x2 maple running under each side of the tabletop and inside the plain leg. It gives it a heavier look and should keep the tabletop from sagging, even if we put something really heavy on it.
I added some plastic cable grommets to the back of each shelf so we can use the outlets under the table without looking at wires. As a bonus, the grommets gave me an excuse to buy a set of Forstner Bits to make perfect 1⅜ inch holes to put them in. Then I noticed that the grommets are actually 35mm. That's about 0.03 inches bigger than 1⅜. I was able to fix it with sandpaper and determination. It's a good thing they came in a 10-pack, because I broke 4 trying to force them in.
I also picked up a belt sander and a few more bar clamps (because you can never have too many). Then I burned up my old buckethead vacuum and bought a new shop vac. I don't know if that counts as "required" for the project.
To finish the table, I used:
- Stainable maple wood filler
- 80 grit then 150 grit in the belt sander
- 220 grit in the hand sander
- 320 grit in a block sander
- Pre-stain conditioner
- English Chestnut stain
- 3 coats of satin polyurethane
The project sat in my garage for 4 weeks. I worked off & on, taking frequent breaks to enjoy the awesome Phoenix springtime. It took a few days of work to construct the table, then about twice as long to sand and finish it.
Noise-blocking Headphones
I built these in 2012, but I forgot to take pictures of them until I was building a table and used them a lot. I wanted to be able to listen to music and podcasts while I used power tools.
So I got a pair of Peltor Hearing Protectors and stuffed a pair of Koss headphones inside.

The wires stay out of the way
I disassembled the headphones, leaving a long wire on the left one and a short wire on the right. I drilled a 1/8" hole in the top of each earmuff and routed the long left wire out of the left cup, through the headband, and into the right cup. I used the grommets that were already on each wire to make a snug fit. There's just enough slack for the headphones to swivel.
Routing the right speaker wire was much easier because it never leaves the earmuff.

The wire goes behind the noise-blocking foam
The headphone speakers just sit inside each cup. At first, I tried taking the speaker completely out of its hard shell and resting it in the foam of the hearing protector cups. That didn't work: they were WAY too quiet. I had to put the hard backings on each speaker to hear them.
I wanted to be able to use these as regular, non-headphone hearing protectors too, so I put in a port instead of having a wire dangling there all the time. I soldered the wires to a panel mount headphone jack and wrapped it all in heat shrink. The headphone jack approach is useful because if the wire catches on something, it just pops out instead of breaking the wire (or pulling me head-first into whatever power tool I was using at the time).

Fllush-mounted port instead of a dangly wire
In the right earmuff, I had to drill a hole for the jack. Then I had to drill a countersink about halfway through the earmuff because the threaded part of the jack wasn't deep enough to reach all the way through. It was a pain to do, but I'm pretty happy that it came out flush mounted when I was done. It's a nice touch I wouldn't have bothered with if the jack had been longer.
Now I can plug in any 3.5mm audio cable. I got one from Amazon with a right angle at one end so it's not pointed straight down at my shoulder.
Of course, I could have just bought a pair ready-made. Amazon has a pair of Howard Leight Noise-Blocking Stereo Earmuffs. It looks like I actually would have spent less that way, but where's the fun in that?
Block Cannon
When I was a kid, we had a Crossbows & Catapults set. You can still get them, and they look pretty cool, but we already had these plain wooden blocks.

I thought it would be fun to make a game kind of like the original Crossbows & Catapults, but shooting little pucks at castles made of those blocks.
Danger and I each made one. I showed him how I was sticking mine together, and he assembled his own. Danger also came up with the name. I was calling them "Wooden block shooters." After he saw how they worked, he dubbed them "Block Cannons."
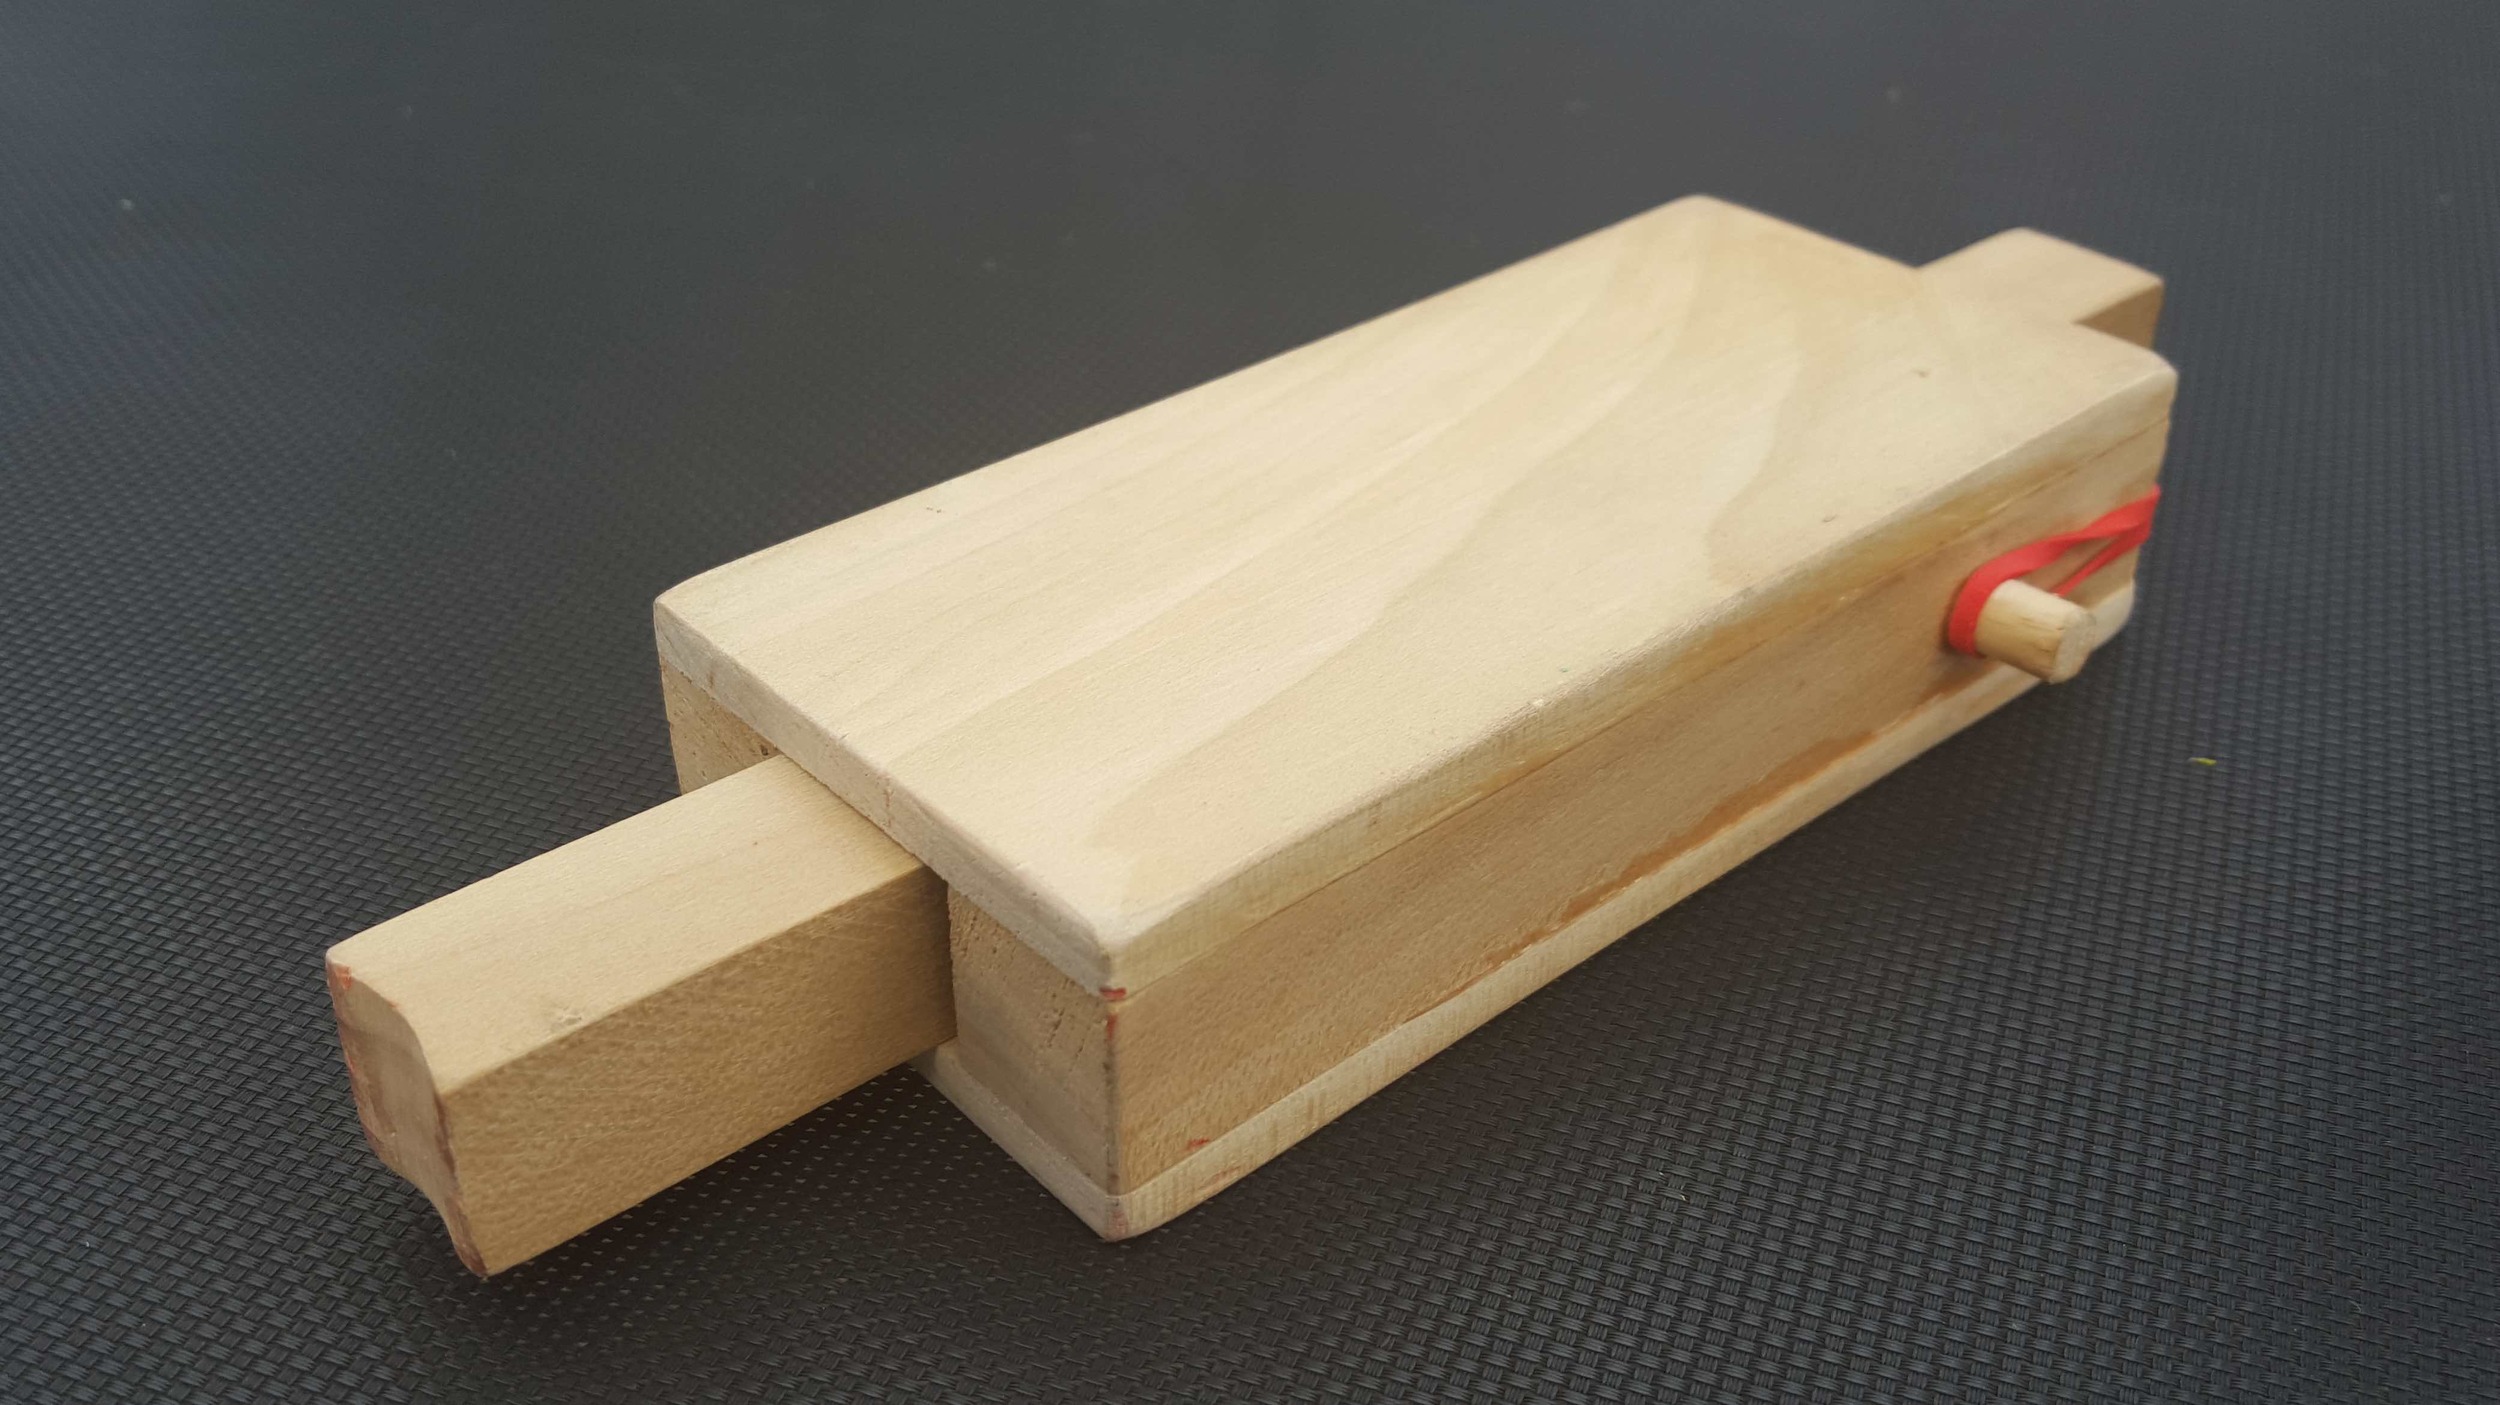
For each cannon, you'll need:
- 2 ea. 2.25" x 0.125" x 6" poplar boards
- 2 ea. 0.75" x 0.75" x 6" poplar sticks
- 1 ea. 0.75" x 0.75" x 9" poplar stick
- 2 ea. 0.375" x 1" round wooden dowels
- 3/8" drill bit
- sand paper
- wood glue
- 1 rubber band
You just glue one 6" stick to each long edge of a 6" board, leaving enough of a gap between them to let the 9" board move freely. Glue the other board on the other side like a sandwich. You need to drill a hole through the 9" board, about an inch from the end. The rubber band in the pictures above is passing through this hole.
Then drill 3/8" pockets about 1/2" deep into each side near the back and glue a dowel in the hole. To assemble, run the rubber band through the 9" plunger and hook each end over one dowel.
I also did some extra sanding: I put a slight groove in the end of the plunger so it's easier to shoot round things straight. Then I rounded over the back corners of the cannon body so it's a little easier on the rubber bands.
A note on the 3/4"x3/4" sticks: mine were not exactly square. Make sure when you're fitting everything together that you don't accidentally end up with a plunger that doesn't fit in your cannon. Once you get it fit, mark which way is "up" and you'll be good.
Chef Knife Comfort Hack
The Problem

When I use my awesome cleaver for a long time, my index finger suffers. It's particularly bad when my hands are wet & I'm cutting hard vegetables.
It's the spine of the knife. It has hard right angles that dig into the base of my index finger as I apply pressure. Maybe I'm the only one who has this problem, but if you have it too, here's an easy solution.
The Fix
You can soften the corners just a little with your knife sharpening kit. I have an Edge Pro Apex 3, but any whetstone will do.
Start with a medium (220) or fine (400) stone and wet it as normal. Gently take a little material off of the corners of the spine where it meets the base of your index finger.
Next, use a very fine (600) stone to smooth out any scratch marks. You could go all the way to 1000 grit to restore the shine if you like.
The Results
It works like a charm. Do yourself a favor and make your tool more comfortable. Mrs. Mojo liked it enough that she asked me to do her knife too.
Keeping Kids Safe
Every parent worries about keeping their kids safe.
So I made mine some armor. It's a European 4-in-1 chain maille vest made of 14 AWG stainless wire wound into 7/16 inch rings. It took about 2,900 rings (and maybe 33 hours) to make the vest. It tips the scales at 7 lbs, and it actually looks like it would be pretty effective against blades.
UPDATE: I tried it out by shooting steel balls at fruit.


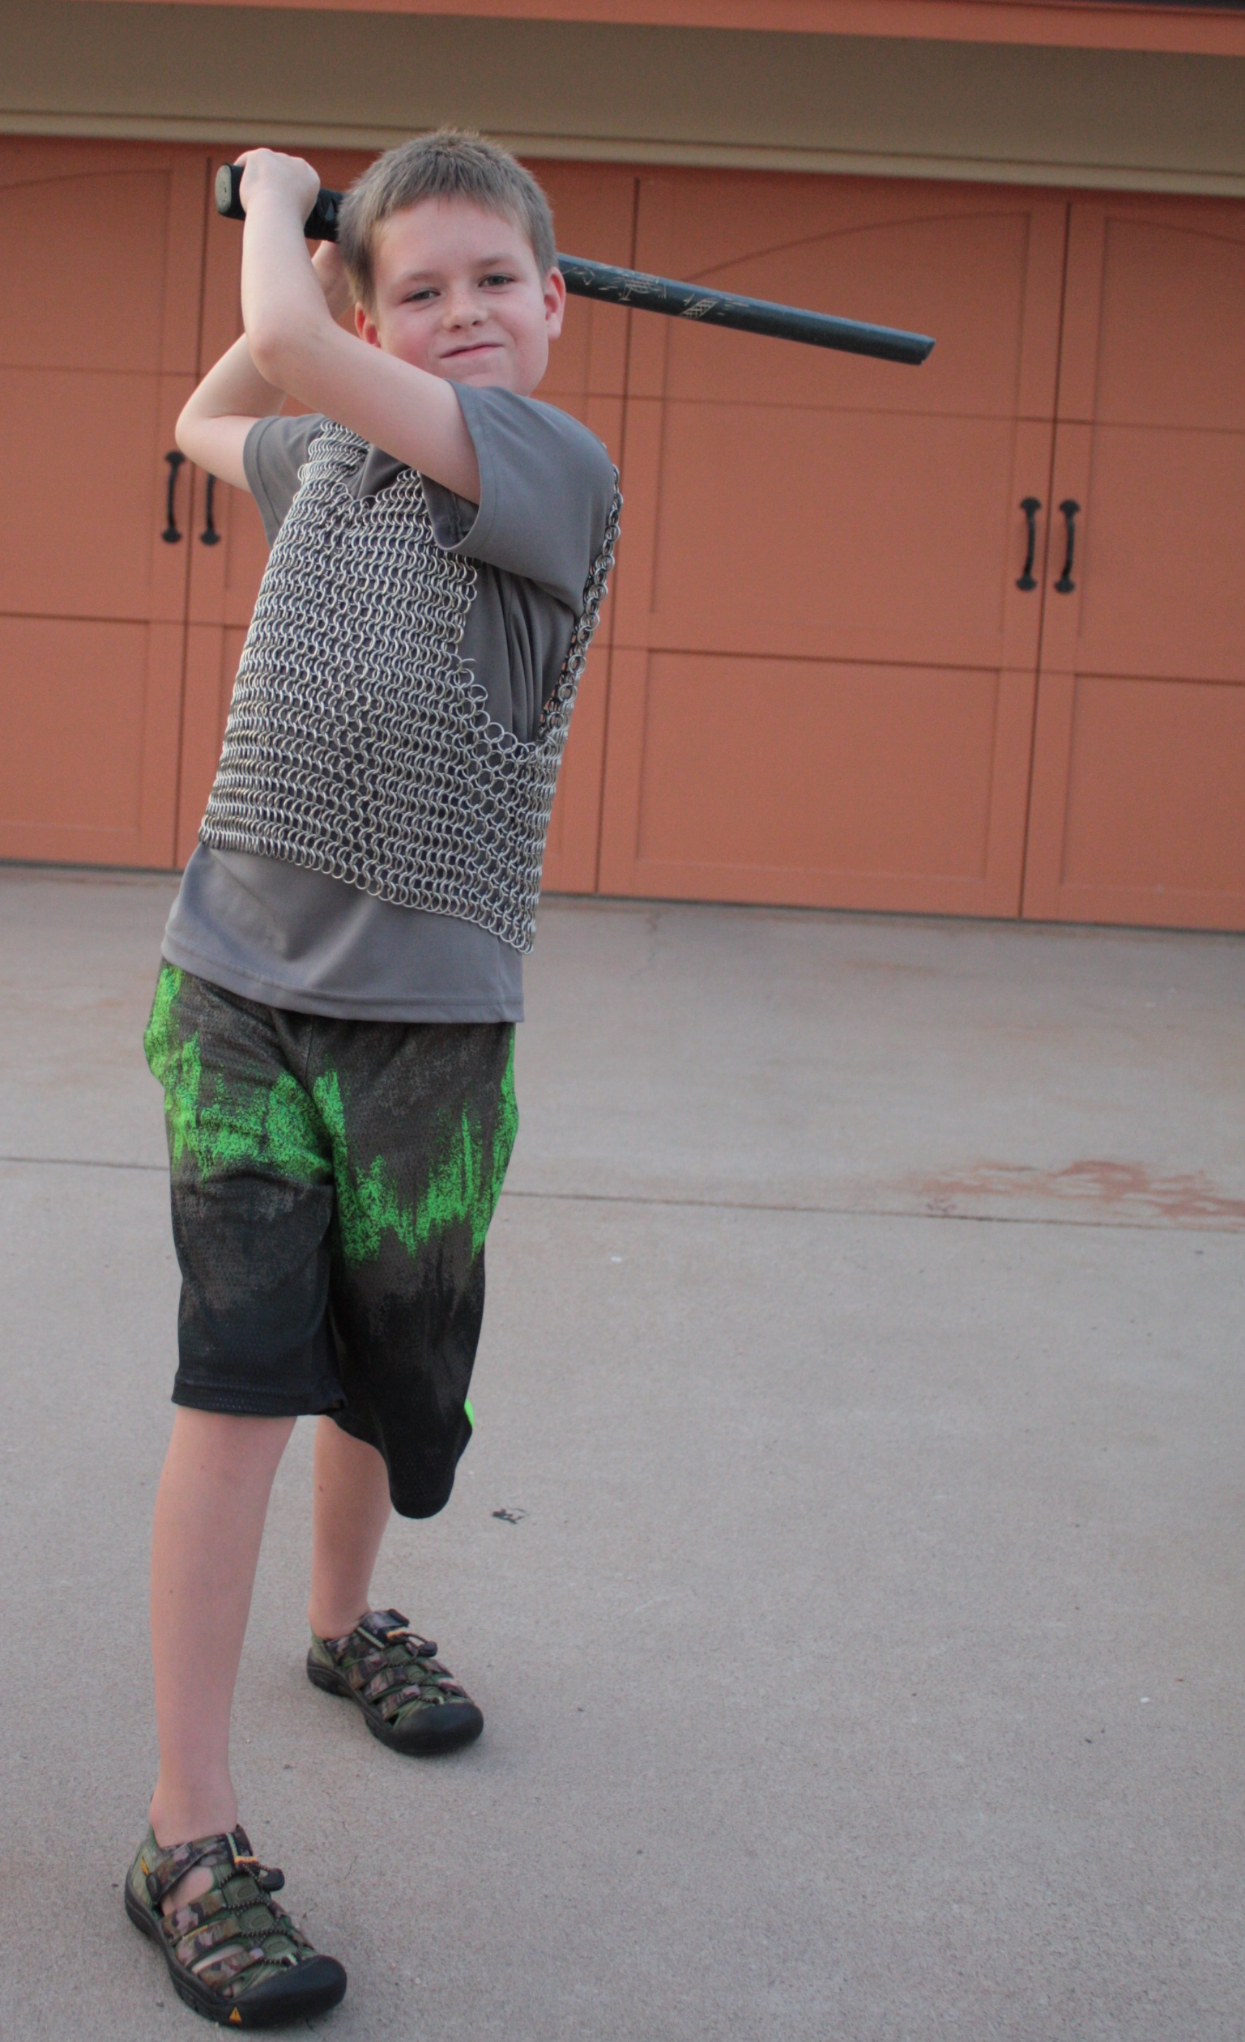
Now my kids are safe from sword-wielding bandits, highwaymen, brigands, desperadoes, and other outlaws plaguing the streets of my suburban community.
I only made one vest, so they'll have to share. Still, I'll sleep easier knowing one of my kids at a time is safe.
Sparkly Pink Flames

Sweetpea just graduated to a new bike!
Well, not a new bike, exactly. It's her bike, but it used to belong to Danger.
But I felt bad about just giving her big brother's cast-offs. As an older sibling myself, I didn't really face this problem, but let's face it: hand-me-downs kind of suck. Besides, this doesn't really suit her style.

You know what would?
Flames.
Sparkly Pink Flames.
So that was my project last weekend: Sweetpea picked out a fuschia metallic shimmer spray paint, I spent 4 hours masking the old red flames, and changed them to fit her style.

Yes, those shoes are on the wrong feet